Working with Google Cloud Storage – Basics of Google Cloud Platform
Majority of the exercises covered in this book inputs the data from the cloud storage, so let us see how we can create cloud storage bucket and upload files to the bucket.
Step 1: Open cloud storage:
Follow the steps described in the Figure 1.20 to open the cloud storage:

Figure 1.20: Cloud Storage Creation
- Users can type cloud storage in the search box.
- Alternatively, users can navigate under STORAGE to Cloud Storage | Browser.
Step 2: Bucket creation:
Users can upload files or folders into cloud storage after creating a bucket. Initiate the bucket creation process as shown in Figure 1.21:

Figure 1.21: New bucket creation
- Click on CREATE BUCKET.
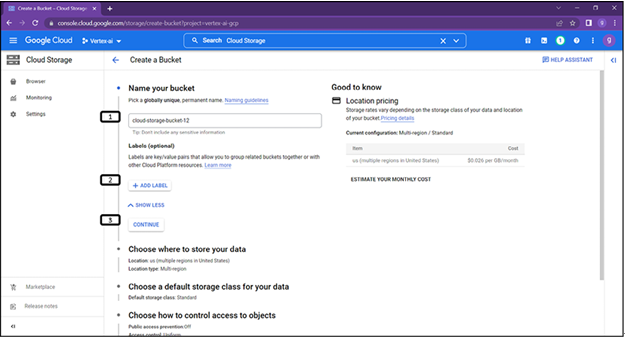
Step 3: Provide name for the bucket:
Follow steps shown in Figure 1.22 to add names, labels to bucket:

- Users need to provide globally unique name for the bucket.
- Labels are optional, it provides key/value pairs to group buckets (or even services) together.
- Click on Continue.
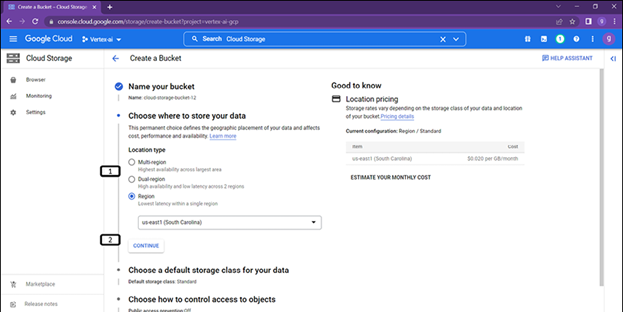
Step 4: Choosing location for bucket:
Follow steps in Figure 1.23 to choose the location of the bucket:

Figure 1.23: Location for the bucket
- Users can select location type. Multi-region gives options to choose multiple regions of America or Europe or Asia. Dual-region provides options to choose two regions belonging to same continent (America, Europe and Asia-pacific). Region provides options to choose one region from the drop-down list. For majority of the exercises which this book covers we will have the data uploaded to bucket belonging to single region.
- Click Continue.
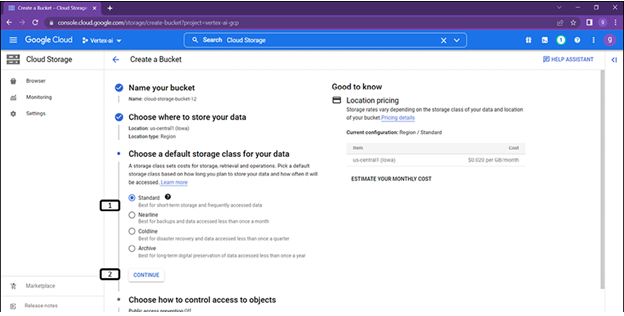
Step 5: Selecting storage class
Follow the steps shown in Figure 1.24 to select the class of storage:

Figure 1.24: Storage class for the bucket
- Choose Standard (Exercises which this book covers we will create standard bucket).
- Click on Continue.
Note: Try providing different options with location and storage class and observe the variation in the price estimates.
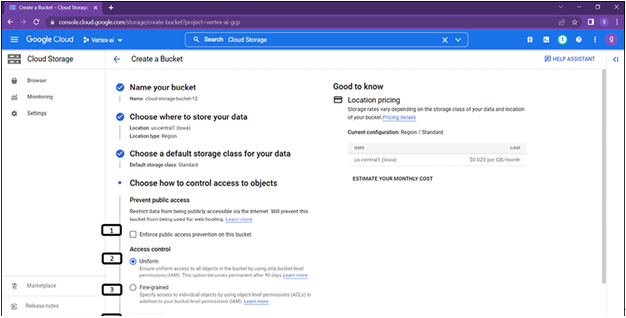
Step 6: Access control for buckets:
Follow the steps described in the Figure 1.25 to configure access control for the bucket:

Figure 1.25: Access control for the bucket
- Selection of the box prevents public access from the internet, if this option is chosen it will not be possible to provide public access through IAM policies.
- Uniform access controls apply same IAM policies for all the folders and files belonging to the bucket (select Uniform)
- Opposite to Uniform access controls, Fine-grained specifies policies to individual files and folders.
- Click Continue.
Step 7: Data protection in bucket:
Follow the steps described in Figure 1.26 for data protection:

Figure 1.26: Data protection for bucket
- GCP provides additional options for data protection, object versioning helps users for data recovery and retention policy helps for compliance (data cannot be deleted for a minimum period of time once it is uploaded).
- All the data uploaded to GCP will be encrypted by google managed encryption key, if users can choose customer managed encryption keys (CMEK) for more control.
- Click on Create.
Step 8: Uploading files to the bucket:
Follow the steps described in Figure 1.27 to upload files to cloud storage:

Figure 1.27: File upload to bucket
- OBJECTS provide users options to upload the data.
- CREATE FOLDER inside the bucket.
- Directly UPLOAD FOLDER from the local system.
- Upload files.
- All the options which users have chosen during the process of bucket creation will be listed under configuration.
- PERMISSIONS provides options to enable prevent public access, or change the uniform access/fine-grained access. Also, it provides options to add users for accessing the bucket.
- PROTECTION tab provides options to enable or disable object versioning and retention policy.
- When specific criteria are satisfied, LIFECYCLE rules allow you to perform operations on the items in a bucket.


